8 Ways to Incorporate Autumn into your Wedding
Autumn is just around the corner, love is in the air, and that means autumn weddings! Here are 8 ways you can weave the snug season into your special day.

Flower arranging is a great way to put your creativity to work to make your wedding day exactly how you want it. To begin, you'll need fresh pumpkins, a carving knife, scissors clear plastic, wet floral foam fillers (flowers, leaves, berries and succulents).
How-to:
Cut the top off your pumpkin so that you have a fairly wide opening near the centre of the pumpkin, and then clean out all the seeds and guts.
Then line the inside of the pumpkin with a sheet of plastic. This will hold some of the moisture in when you water the floral foam.
Cut a piece of floral foam with the knife to a size that will fit inside your pumpkin. It’s best to soak the foam in water while you prepare your flowers.
Select the flowers and what you will like in your floral arrangement. The best flowers to use will have strong, straight stems and are freshly cut.
Place the floral foam inside of the pumpkin and create your arrangement. It is best to start with flowers then add leaves, berries, and other embellishments to create a full and interesting arrangement.
If you want you can even pop the top of the pumpkin on your arrangement and hold it on with a piece of floral wire inserted into the floral foam.

2. Pinecone Place Card Holders
These cute festive wedding place card holders are very simple to make with just a little bit of work. You’ll need mini pinecones, a hacksaw, safety gloves, a marker, and paper cards.
How-to:
Set each pine cone down on a flat surface to see how it stands up, this way you can decide the best place to cut it.
Wearing the safety gloves, use the hacksaw, cut a 3/4″ slit down the middle of the pine cone.
Place a name card in each slot, and you are done!
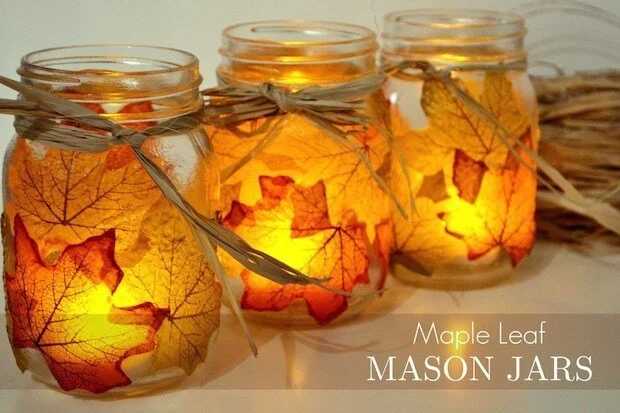
3. Maple Leaf Mason Jars
These jars are super simple and can be used in so many ways to decorate your wedding. Plus, nothing else says "Victoria, BC" like mason jars!
You'll need Mason Jars, Maple leafs (real or fake), mod podge glue, a sponge brush, and twine. Let's get started!
How-to:
Apply the mod podge to a mason jar using the sponge brush
Apply the leaves overlapping so there are no gaps
Leave to dry, after tie twine just under the lip of the jar in a bow.

4. Nature Candles
Bring the outside into your wedding with this simple but gorgeous candle idea. You'll need clear vases of varying sizes, water, twigs and floating candles.
How-to:
Make sure the vases are clean.
Arrange twigs in the bottom of the vases make sure to leave an inch or two from the top.
Fill the vases with water until the twigs are submerged.
Place a floating candle in the water of each vase.
Light when ready to use.
5. S’mores Bar
Keep the kids (and even the adults) entertained with a S'mores bar at your wedding. Your friends and family are sure going to love you when they see it. You'll need an organization structure or bowls or vases, several burners and lighter (or a fire pit), long skewers or roasting sticks, napkins, marshmallows, chocolate, and graham crackers.
How-to:
Make or buy some sort of structure where you can organize your S’mores bar. Or use bowls or vases
If you are already going to have a fire going, great. If not, set up burners in a safe location.
Organize your fixings and skewers/roasting sticks however you like near your fire pit or burners.
Unless you want sticky fingers everywhere, make sure to have napkins readily accessible.
Light burners when ready.


Have your guest get creative as they sign and create a beautiful fall tree that you can cherish your wedding day forever--nothing better for a couple who loves fall! You'll need a piece of plywood (for your tree), a 2-D tree (either draw one or make one out of construction paper or cardstock), all coloured construction paper or cardstock, scissors or leaf punch, double sided tape and glue.
How-to:
Adhere tree to the plywood with glue, really make sure it is attached securely.
Cut out leaves from the construction paper or card stock. Make sure to have a good selection so that they are not all the same colour. You can use a leaf shaped punch or scissors free-handed or even try using a stencil. Make sure the leaves are big enough that your guest can write on them but small enough that everyone’s leaf can fit on the tree.
Place a piece of double-sided tape every leaf. Do not peel the paper off the other side of the tape, your guest will do this to adhere their leaf to the tree.
Display your tree with your pre-made leaves and pens nearby.
After the wedding, you could also get your guestbook tree framed to preserve it.

7. Fall Leaf Place Setting
Liven up your tables with these festive place settings, your wedding guests are sure to love. You'll need a hot glue gun and glue, parchment rounds, lace doilies or circles of fabric, and dried autumn leaves and sprigs (Bonus points if they match your colour theme!).
How-to:
Starting with the outside, lay out your accent sprigs on the edge of your round.
Glue the sprigs down and then glue down leaves on the edges.
Starting on the new layer, use a different kind of leaf to create an inner circle.
As you move through to the center, glue leaves down to a center point and place a final leaf in the center. You could also leave the center free and leave a handwritten note to your guest to see when their plate is clear.

8. Fall Walkway
Liven up your standard white wedding aisle runner with festive fall colours. You'll need a white aisle runner and rose petals or maple leaves in fall colours (real or fake, depending on your taste and budget).
How-to:
Separate your petals or leaves into each colour.
Lay out the aisle runner. If you want to make your runner before your ceremony you can spray the runner with spray glue.
Lay out your petals or leaves starting with the lightest colour. Work through all your petals or leaves, from light to darkest. If you are pre-making the runner, you are going to want to keep layering the spray glue as you go.
To transport: Let it dry. The starting from the lightest side lay down around rod that is a bit longer than the width of the runner. Roll the rod gently and slowly until you have rolled up the entire runner. When laying it down for the ceremony, place the roll down at the end of your aisle and roll it out to the bride’s entrance.
There you have it, 8 ways to incorporate this beautiful season, into your wedding. Which one are you 'falling' for? Let us know below in the comments below.